Friday, April 29, 2011

The Perfect Pad Thai

    I was trying to eat up all the vegetables I didn't get to this past week. Rather than wasting them, I usually toss them into a stirfry of some sort. This time I felt like Shrimp Pad Thai.
    Pad Thai is an all time favourite of mine. I've had it a bunch of times in various restaurants, but I find that they are always to heavy handed with the noodles, and they never put enough of the good stuff in there. Because of this reason I choose to make my own at home. I believe I do a much better job :)
   

Shrimp Pad Thai:

Ingredients:
1 Tbsp. tamarind concentrate or tamarind paste dissolved in water
2 Tbsp. fish sauce
2 Tbsp. palm sugar or brown sugar
2 tsp. chili sauce
1 serving rice noodles
1 Tbsp. peanut oil
1 serving shrimp/chicken/tofu
1 shallot (chopped)
2 cloves garlic (chopped)
1 egg (lightly beaten)
2 Tbsp. roasted peanuts
1/2 cup carrots (julienned, very thinly)
1/2 cup celery (cut on the bias)
1/2 cup red/green pepper ( very thinly sliced)
1 green onion (thinly sliced)
1/4 cup cilantro (chopped)
lime wedges

*Most people use bean sprouts as the main vegetable. I really don't like bean sprouts so I chose to use the vegetables that I had on hand.

Directions:
1) Slice all the vegetables so they are ready to go.
2) Prepare the sauce by combing the tamarind, fish sauce, palm sugar, and chili.
3) Quickly scramble the egg.


All the fixin's ready to go. While cooking Thai food,
it comes together quite quickly. It's best to have all
the ingredients prepared and ready to go before
you start cooking


The sauce Makings.
(Tamarind Concentrate, Fish Sauce,
Sambal Oelek(chili sauce), Palm Sugar)


If you're opting to use palm sugar, make
sure you grate, rather than chop it. You
want it to dissolve quickly into the sauce.
4) Cook the noodles according to the package directions.
5) Heat oil in the pan.
6) Add the shrimp, shallots and garlic. Saute for 3 minutes.


When the shrimp start to turn pink, it's time
to flip over and cook the other side. They only
take a moment, so be careful not to over cook.

7) Add the sauce and the noodles. Mix and move to the side of the pan.
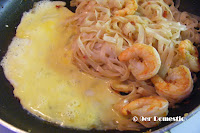
8) Add the egg, let sit a moment and then mix it in to the noodles.

9)Add the vegetables and let cook for a minute. Combine with the noodles.


10) Add the peanuts, green onion and cilantro. Remove from heat.
11) Serve with lime wedge.

Waste Not, Want Not

    I had a container of fresh spinach sitting in my fridge. Since we were leaving on a trip to Germany in just a couple of days, I knew I wouldn't get to it in time. I figured I would turn it into something I could snack on up until we leave. Spinach Dip was the perfect choice.
    This simple, but delicious recipe was shared with me by a lady I met while we were posted to Winnipeg, MB. Her and I have since then lost touch, but I make her Spinach Dip quite often. Every time I eat it, I think of her. She would always bring the most wonderful potluck items to our get together's. All she said when she gave this recipe to me was, "It needs to be served with fresh French Baguette". So if you decide to make this recipe for yourselves, don't forget the fresh bread.

Spinach Dip:

Spinich Dip with French baguette, mini pita's and
veggie sticks for dipping.


Ingredients:
1 package of fresh spinach, steamed
2 Tbsp. red onion, diced
1/2 cup mayo (I only use Hellman's)
1/2 cup sour cream
1 Tbsp. lemon juice
salt and pepper
water chestnuts, optional
various breads and vegetables for dipping

Directions:
(1) Steam the fresh spinach in a large pot with a vegetable steamer. Place about 1 cup of water in the bottom of the pot, add the spinach and cover with a lid. Turn the heat on medium high. When you begin to smell the spinach, it should be ready. Remove from the heat and let cool.

Before...

After
(2) Remove the spinach from the pot and drain all the water using paper towels.
 
At this point you can place the spinich in
a container with a tight fitting lid. If you
have no use for the spinich yet, just freeze
it until a use for it comes up.
(Lasagna, Ravioli, Italian Wedding Soup etc.)

(3) Finely chop the steamed spinach and add to a bowl.
(4) Combine with the rest of the ingredients.
(5) Stir to combine.
(6) Serve cold with various breads and vegetables.

I can't get enough of this stuff.

Sunday, April 24, 2011

Easter Morning Pancakes...

    Since it was Easter Sunday we pulled out one of our "special" pancake recipes. I would liked to have made something new, but since it was just the two of us today, I didn't want to start experimenting. After all, I would be the one eating all the leftovers (or everything, if the little guy happened to not like it).
    With these pancakes, I am able to freeze any leftovers, and I am certain that they will be eaten for breakfasts this upcoming week.

Apple Cinnamon Pancakes with Homemade Cinnamon Syrup:

Apple Cinnamon Pancakes served with
Warm Homemade Cinnamon Syrup

Ingredients:

2 eggs
2 cups flour, sifted
1 cup milk
1 cup cinnamon flavored applesauce
1/2 tsp.  ground cinnamon
1/4 vegetable oil
2 Tbsp. sugar
2 Tbsp. baking powder
1 tsp. salt

Directions:
(1) Beat the eggs until fluffy.


(2) Sift and combine all the dry ingredients.


(3) Bring all ingredients together in one bowl; mix to combine.


(4) Heat griddle over medium high heat.
(5) Use 1/4 cup of the batter for each pancake. Pour out onto the griddle. Once bubbles start to appear in the tops of the pancakes, flip and continue cooking.
(6) Serve with warm cinnamon syrup.

* Makes 15-16 pancakes.

Syrup:

Ingredients:
1 cup sugar
3/4 tsp. cinnamon
1/2 cup light corn syrup
1/4 cup water
1/2 cup evaporated milk

Directions:
(1) In a saucepan, combine sugar and cinnamon. Pour in corn syrup and water. Stir to dissolve.
(2) Boil, stirring constantly 2-3 minutes. Cool.
(3) Stir in milk and serve. Refrigerate leftovers for up to a week.

* Makes about 500ml of syrup.
  
If you have any leftover batter, don't forget to cook it up and freeze it for later in the week.

You may also like:
 White Chocolate Macadamia Nut Pancakes
Classic Buttermilk Pancakes
Smores Pancakes

Friday, April 22, 2011

Easter Egg Candy Cookies...

    This is the recipe for my little guys favourite cookies. We've been making these together for what seems like forever. They are usually made with traditional Reese's Pieces candy, and are supposed to be an Autumn themed cookie (because of the brown, orange and yellow colors). But the other day while I was at the grocery store I came across some of these candies that were in the shape of mini eggs. How great is that? A few years ago, I found them in green and red for Christmas as well, but haven't seen them since.
    We make these cookies at least once a month, so it's fun to be able to make them festive by switching up the candies. I hope you like them as much as we do.

Chocolate Peanut Butter Candy Cookies:

Chocolate Peanut Butter Cookies
with a nice cold glass of milk.

Ingredients:
1/2 cup white sugar
1/2 cup packed brown sugar
1/2 cup margarine or softened butter
1/2 cup peanut butter
1/2 tsp. vanilla
1 egg
1 1/4 cups all purpose flour
1/4 cup unsweetened baking cocoa
1 tsp. baking soda
1/4 tsp. salt
1 1/4 cups chocolate coated peanut butter candies

Directions:
(1) Heat oven to 350 degrees F.
(2) Lightly grease two 9x13" baking sheets with cooking spray.
(3) In the bowl of a stand mixer (or a large mixing bowl with a hand held electric mixer), beat sugars and butter on medium speed until creamy. Beat in peanut butter, vanilla and egg.
(4) In a separate mixing bowl, sift together flour, cocoa, baking soda and salt.
(5) Slowly combine dry ingredients into the wet ingredients. Stir in candies. (If your making this recipe with the egg shaped candies, don't add them here. They are far to large and cannot be stirred into the dough properly. I just added them near the end to the top of the cookie).

(6) Drop the dough by Tbsp. fulls onto the greased cookie sheets.

(7) Press the cookie dough mounds down with a wooden spoon and decorate with a few more candies. (This is where I added the egg candies)
(8) Bake for 8-10 minutes, or until edges are set. Centers will still be soft. Cool for 1 minute and remove from cookie sheet to rack.

 
* Makes 24 cookies

You may also like:

Thursday, April 21, 2011

A Simple Spicy Soup

    So I am still eating the Tandoori Chicken. It's on it's last day today, so I need to use it all up. What better way to do that, than to make a pot of soup. And I have just the recipe for the job. Chicken Mulligatawny.
    Chicken Mulligatawny is an Indian curried soup similar to our North American "Chicken and Rice Soup". It is flavored with curry and various other Indian flavors, given a yellowish color by using turmeric, and is traditionally thickened with rice. When translated literally, it means "pepper water".
    This is a delicious, hearty soup that is guaranteed to warm you up on a chilly day. I make my version using chicken or turkey, but have read recipes that have used beef or lamb as well. Whatever suits your mood will do...

Chicken Mulligatawny:


Ingredients:
1 Tbsp. butter
1 Tbsp. oil
3 celery stalks, finely chopped
1 medium onion, finely chopped
2 carrots, finely chopped
2 Tbsp. all purpose flour
2 tsp. garam masala
1 1/2 tsp. ground coriander seed
1 tsp. turmeric
1/2 tsp. cayenne
4 cups of chicken stock
1 bay leaf
1/2 cup raisins or snipped prunes (optional)
    (I'm not really in favor of these. I've added them a few times just to try them out, but they're just plain weird. They swell up from the liquid of the soup and basically become "grapes" again...ick)
1/2 cup granny smith apples (peeled, cored and cubed)
1/2 tsp. lemon zest
1/4 tsp. crushed thyme (dried)
salt and pepper to taste
2 cups basmati rice (cooked)
2 cups tandoori chicken (precooked and diced)
1/2 cup milk or light cream
1 cup light coconut milk (canned)
shredded coconut and cilantro as garnish

Directions:
(1) In a large pot heat butter and oil.
(2) Add the celery, onion and carrots. Cook until tender. (About 15 minutes)


(3) In a separate bowl combine together flour, garam masala, coriander, turmeric and cayenne pepper.


(4) Add to the pot, and stir to combine. Cook for about 3 minutes, or until fragrant.
(5) Add chicken stock, bay leaf, raisins, apples, lemon peel, thyme, salt and pepper.
(6) Bring to a boil. Reduce heat and simmer for 20-25 minutes.
(7) Remove bay leaf. Add the chicken and rice.
(8) Before serving add milk and coconut milk.

(9) Garnish with cilantro and shredded coconut. Serve with warm Naan bread.

Wednesday, April 20, 2011

The Better Butter Chicken

    We had a mountain of leftovers from the Tandoori Chicken I made yesterday. I thought I could put it to good use by making a batch of something that I could portion out, and put in the freezer. This way, on the busy days of the week when I have little time to cook (or just don't feel like it), I just have to thaw and reheat.         
    Since it was Tandoori Chicken I was working with, I thought I would stick with the Middle Eastern flavor theme. So I checked out what was available in my pantry and decided to make Indian Butter Chicken.
    Traditionally Indian Butter Chicken is made with loads of, well, butter....but I use a lighter version of the recipe that's much kinder to my waistline and my arteries.

Indian Butter Chicken:
(Adapted from Janet and Greta Podleski's, Eat Shrink and be Merry)

Indian Butter Chicken over Basmati Rice
with a side of Steamed Broccoli

Ingredients:
1 Tbsp. butter
1 Tbsp. oil
1 1/2 onion, chopped
1 Tbsp. garlic, minced
1 1/2 Tbsp. ginger, grated
3/4 tsp. turmeric
1/2 tsp. fenugreek seeds, optional (These can be really hard to find. I have made this recipe many
           times without the fenugreek, and it tastes great regardless).
1 can (28oz/798ml) tomatoes, drained
1 1/2 cups chicken stock
1 Tbsp. brown sugar
1/4 tsp. salt
1/4 tsp. freshly ground black pepper
1/3 cup light sour cream or plain yogurt (not fat free)
1 Tbsp. fresh cilantro, chopped
1 Tbsp. cashew or almond butter (this helps to thicken the sauce)
1/4 cashews, as garnish
1/2 of a tandoori chicken, precooked and cut into pieces 
            (Or 3 chicken breast that have been precooked and cut into cubes)
Hot cooked basmati rice, optional (yield one 1/2 cup for each serving)

Directions:
(1) Heat the butter and oil together in a large heavy bottomed pot, over medium heat.
(2) Add the chopped onions and saute until tender. About 5 minutes.
(3) Add the ginger, and all the spices. Stir to combine, and cook for another minute.
(4) Add the drained tomatoes, chicken broth, brown sugar, salt and pepper. Bring to a boil, then reduce heat to low. Cover and simmer for 10 minutes, stirring occasionally.

(5) Remove from heat.
(6) Transfer the sauce to a blender to puree, working in batches. (It is very important to firmly hold down the lid of the blender. When adding a hot liquid, pressure builds up in the sealed pitcher causing the lid to slip off).

(7) Return the sauce to the pot.


(8) Stir in the sour cream, as well as the cashew or almond butter.
(9) Add the precooked Tandoori Chicken and mix well. Continue cooking until the chicken is hot.
(10) Serve over hot Basmati Rice. Garnish with the chopped cilantro and cashews.


* I always freeze any leftover sauce. Once all the hard work is done it makes a super easy weekday meal. All you need to do is pour the sauce over some chicken and rice and the whole thing can be made in no time.

Tuesday, April 19, 2011

Grillin' it up, Tandoori style...

    Since I had my Tandoori Masala prepared, and the weather was nice enough for a BBQ, I made Tandoori Chicken.
    Tandoori Chicken is a super popular Indian/Pakistani dish. It is traditionally prepared at high temperatures in a tandoor or clay oven (all I had at my disposal was the good old propane grill in my backyard. Which worked great by the way). It's marinaded in Tandoori Masala, a curd of some sort (commonly plain yogurt or sour cream), as well as lemon juice, fresh cilantro leaves and some salt and pepper. Cayenne pepper or red chili powder are used to give it the traditional red hue.
    I didn't add the cayenne pepper because I was sharing with my little guy, and his delicate palate couldn't handle something that spicy. So my chicken doesn't have the "blood red" color commonly associated with Tandoori Chicken, but it still has all of the flavor.....or most of it anyway.


Tandoori Chicken:

Fresh from the grill...
The top is a little charred, but it's still
delicious.
Ingredients:
1 rotisserie sized chicken
1/2 cup plain yogurt
2 Tbsp. fresh lemon juice
1 Tbsp. minced garlic
1 Tbsp. fresh ginger, grated
4 Tbsp. tandoori masala
4 Tbsp. cayenne pepper
1/4 tsp. freshly ground pepper
salt to taste
1 Tbsp. fresh cilantro

Directions:
(1) Prick the chicken all over with a fork. Then using a sharp knife, score the flesh to allow the marinade to penetrate.

(2) Rub the chicken all over with the cayenne pepper (I skipped this step).
(3) Place the chicken in a large resealable plastic bag.
(4) In a large bowl combine all remaining ingredients to create the marinade. Stir until well mixed.
(5) Pour into the bag over the chicken. Seal the bag, and coat the chicken with the marinade.

Seee ya tomorrow...
(6) Place on a tray and refrigerate. Marinade for 8 hours to overnight. (Do not marinade for more than 2 days).
(7) Once ready to cook, remove the chicken 30 minutes before cook time.
(8) Preheat your grill to 400 degrees. Place the chicken on a roasting stand, and place the roasting stand on a tray to catch the drippings.
(9) Remove the chicken from the marinade, pressing lightly to remove the excess. Place the chicken on the roasting stand.


(10) Once the chicken is in place on the grill, cook using indirect heat. (For the side of the grill that the chicken is on, turn the heat to low. The other side should remain on high. You will need to pay careful attention to the chicken from this point on, rotating it every 20 minutes. This will keep one side from being cooked before the other).
(11) Cook for an hour or until the chicken reaches an internal temperature of 170 degrees F.


(12) Once cooked, place on a serving platter and let rest for 10 minutes.


(13) Serve with lemon, red onion, cucumber and sprigs of fresh cilantro if desired.

* Alternately you could use chicken pieces and cook the straight on the grill

Monday, April 18, 2011

Authentic Indian

Tandoori Masala:


Ingredients:

2 Tbsp. cumin seed
2 Tbsp. coriander seeds
1 stick cinnamon, broken into pieces
1 Tbsp whole cloves
1 Tbsp gound ginger
1 Tbsp. turmeric
1 Tbsp. mace
1 Tbsp salt
1 Tbsp garlic powder
1 tsp cayenne pepper

Directions:

(1) Toast everything in a pan until fragrant.


(2) Place everything in a mortar and pestle/coffee grinder. Grind until it becomes a powder.

Before...

After...


(3) Store in an air tight container.


Sunday, April 17, 2011

Easter Egg Fun

    A favourite childhood activity of mine during April was Dying Easter Eggs. We had another rainy day to fill today so I thought it would be fun to dye eggs with my little guy. After all, Easter only comes around once a year. I figure I might as well take this opportunity to do something festive.
    If you have eggs, food coloring, vinegar, some tap water and an hour or so to spare you might find this fun as well. We had a great time.
    While dying the eggs, we used the hard boiled egg method (which is apparently the easiest method). I tried a bunch of different times to "drain" the egg from the shell but this is harder than it sounds. I could never make the holes large enough for the egg to actually drain out, without ruining the shell altogether. I tried blowing air in the holes and also letting the punctured eggs sit on a tray over night to drain out...but nothing worked. So I didn't "choose" to use hard boiled eggs, as much as I had no other option. Maybe I'll go another way next year.

Dying Easter Eggs with Food Coloring:


Materials:

Eggs
Water
Vinegar
Glasses (1 for each color of dye)
Spoons  (1 for each color of dye)
Paper Towel
Food Coloring (As many different colors as you want)
Empty Egg Carton


All ready to go...

Directions:      

(1) Hard boil your eggs as desired.
(2) In each glass, mix together warm water with a Tbsp. of vinegar and 8-10 drops of food coloring. I used my Wilton gel colors, and once they dissolved in the warm water, they worked great.
(3) Submerge your eggs and leave them in there until they reach the desired color. About 10-15 minutes. All I had on hand were brown eggs, and I was worried that the colors wouldn't show through. This wasn't the case. As long as the dye is intense, they will work just fine.


(4) Once the eggs have been dyed, dry them off with a paper towel.
(5) Place them on an upside down egg carton to allow them to dry.


(7) Admire your beautiful eggs!

* The food coloring will dye your eggs a small bit. But this doesn't mean you can't eat them. Just peel them and turn them into Deviled Eggs, Egg Salad Sandwiches etc.


Saturday, April 16, 2011

Easter Cookies on a Rainy Spring Day

    Today was the most perfect day for baking cookies. It was raining, and I had been wanting to spend a day in the kitchen for some time now. Being that this is the last weekend before Easter, I figured it was now or never for these cookies.
    Whether you're baking shortbread, gingerbread, or sugar cookies....they're gonna take the better part of the day to make. That's why I waited for a weekend to make them. From start to finish, you are going to need about 5 hours to complete the making of the dough, making and coloring the icing, rolling out and cutting the dough into cookies, baking and cooling the cookies, and then decorating them. It's the perfect way to kill a day where you have nothing else on the agenda....We had a great time together.

Sugar Cookies:


Ingredients:
 
3 cups all purpose flour
1/2 teaspoon salt
1 teaspoon baking soda
1 cup unsalted butter, room temperature or margarine 
1 cup granulated white sugar
2 large eggs
2 teaspoons vanilla extract


Directions:

(1) In a large bowl, sift together the flour, salt and baking soda.
(2) In the bowl of a stand mixer (or with a bowl and a hand held electric mixer), beat the butter and sugar until light and fluffy (about 3-4 minutes).
(3) Add the eggs and vanilla extract and beat until combined.
(4) Add the flour mixture and beat until you have a smooth dough.
(5) Divide the dough in half, and wrap each half with plastic wrap. Place in the fridge for at least one hour, or until the dough has become firm enough to roll.


(6) Preheat oven to 350 degrees and place the rack in the center of the oven.
(7) Line 2 baking sheets with parchment paper.
(8) Remove one half of the dough from the fridge, and on a lightly floured surface roll out the dough to a thickness of 1/4 inch. Cut out desired shapes using a lightly floured cookie cutter, and transfer cookies onto a prepared cookie sheet.


(9) Place the baking sheets with the cut out cookies on them into the fridge to chill for 15 minutes. (This will prevent the cookies from spreading and loosing their shape while baking).
(10) Bake cookie for about 8-10 minutes, depending on their size, or until the edges are just barely starting to brown. (I always cook my cookies for the least amount of time specified by my recipe. For instance, I cooked these for only 8 minutes. Once you remove them from the oven, the internal heat will continue to cook them without drying them out. Resulting in a moist end result).


(11) Remove from oven and transfer to a wire rack to cool.


*This recipe yields 24 Large Cookies.


Confectioners Frosting:

Ingredients:

2 cups confectioners sugar (icing or powdered sugar, sifted)
1/2 cup unsalted butter, room temperature (margarine will also work well)
1 tsp. vanilla extract
assorted food colors, if desired

Directions:

(1) In the bowl of a stand mixer (or with a bowl and a hand held electric mixer), cream the butter until smooth and blended.
(2) Add the vanilla extract.
(3) With the mixer on low speed, gradually beat in the sifted sugar.
(4) Scrape down the sides of the mixer and the beaters. Beat on high until light and fluffy. 3-4 minutes. (If you find the frosting to be too dry, add a small amout of milk to loosen it, and beat on high for another 30 seconds or so).


Divide the frosting into as many containers as
you want colors.


Remove a small amount of the corner from
as many resealable plastic bags as you have
colors of icing.


Fit each bag with a coupler and various
icing tips. Fill each bag with a different
color icing.


Frost the cookies, and let dry. Place in an
air tight container.