Wednesday, August 31, 2011

Slow Cooker Tex Mex Pulled Chicken

    This is the chicken recipe I use pretty much every time I make Mexican. Whether it be Nachos, Burritos, Tacos, Empanadas or Chimi Changas, this Tex-Mex Pulled Chicken will work well.
    Since this recipe creates a fairly large batch, I like to portion the leftovers and freeze it for later use. This way you can make the most delicious Chicken Nachos pretty much on demand.
   
     
Slow Cooker Tex-Mex Pulled Chicken:


Ingredients:

3 whole ancho chilies
3 whole pasilla chilies
4 cloves garlic, unpeeled
2-3 chilies in adobo
1 small red onion, chopped
3 Tbsp. extra virgin olive oil
2 Tbsp. honey
1 Tbsp. cider vinegar
kosher salt
2 tsps. dried oregano
3 3/4 cup chicken stock or low sodium chicken broth
8 chicken thighs, legs removed and skin off
freshly ground pepper
2 bay leaves
1 cinnamon stick

Directions:

(1) Place the ancho and pasilla chilies, as well as the garlic into a microwave safe bowl.
(2) Microwave on high until soft and pliable. About 45 seconds.
(3) Stem and seed the chilies. Peel the garlic.

Right: Ancho Chili  Left: Pasilla Chili

Slice the chili down the center exposing
the inside. Using the blade of your knife,
scrape out the seeds and veins.
(4) Break down the chilies into smaller. Place the chilies and the garlic into a large food processor or a blender.
(5) Add the chipotles in adobo, onion, 2 Tbsps. of olive oil, honey, cider vinegar, 1 Tbsp. salt, and the oregano to the blender. Purée until smooth.

Chipolte in Adobo.
Before...
After
(6) Heat the remaining Tbsp. of oil in a large skillet over high heat. Add the chili sauce and fry, stirring until thick and fragrant (about 5 minutes).

Before...

After
(7) Heat the chicken stock in a microwave until warm.
(8) Pour the stock into the skillet, stir to combine. Simmer until slightly reduced and thickened (about 20 minutes).


(9) Arrange the chicken thighs into the bottom of your slow cooker. Season with salt and pepper.
(10) Add the bay leaves and the cinnamon sticks.

(11) Slowly add the chili sauce. Cover and cook on low for 8-10 hours.

Before...

After
(12) Once the chicken is cooked, transfer to a large dish using a slotted spoon.
(13) Remove the bones, bay leaves and cinnamon stick. Reserve half of the braising liquid (by doing this you can use the leftover liquid for cooking rice, or adding moisture back to the chicken if it seems to dry) and strain through a fine sieve. Discard remnants.
14) Using two forks, pull the chicken apart.


*I have used a 4 Lbs. pork shoulder with this recipe as well, and had great success.

Tuesday, August 30, 2011

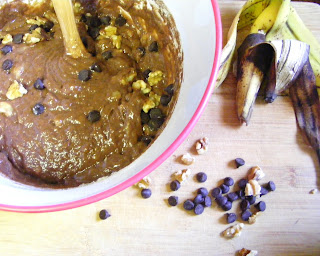
Double Chocolate Banana Loaf with Toasted Walnuts

    I had a few over ripe bananas that I didn't want to go to waste. What better way to use them them in a Double Chocolate Banana Loaf with Toasted Walnuts. I found this recipe a while back, while searching for a way to use my over ripe bananas that wasn't the traditional Banana Bread. Since I have a family of chocolate lovers, I figured this would work just fine. I'm glad I tried it out, because it was a hit.

Double Chocolate Banana Loaf with Toasted Walnuts:


Ingredients:
1/2 cup walnuts
1 3/4 cups all purpose flour
1/4 cup unsweetened cocoa powder
1 cup white sugar
1 tsp. baking powder
1/4 tsp. baking soda
1/4 tsp. salt
1/2 cup dark or white chocolate chips
2 Lg. eggs, lightly beaten
1/2 cup unsalted butter, melted and cooled
3 Lg. ripe bananas, mashed (about 1 1/2 cups)
1 tsp. vanilla extract

Directions:
(1) Preheat the oven to 350 degrees F, and place the oven rack to the middle position.
(2) Prepare a non-stick loaf pan by spraying with cooking spray.
(3) Place the walnuts on a baking sheet and bake for 5-7 minutes, or until lightly toasted. Let cool, and then coarsely chop.
(4) In a large mixing bowl, sift together the flour, cocoa powder, sugar, baking powder, baking soda and salt.
(5) In a second mixing bowl, combine the bananas, eggs, melted butter and vanilla.
(6) With a rubber spatula or a wooden spoon, lightly fold the wet into the dry ingredients until just combined and the batter is thick and chunky. Fold in the nuts and the chocolate chips.


(7) Bake for 55-65 minutes (22-25 for muffins), or until a toothpick inserted into the center comes out clean.
(8) Place on a wire rack to cool and then remove the bread from the pan.

*Recipe yields 1 loaf, or 12 muffins.

You may also like:
Banana Chocolate Chip Muffins
Banana Chocolate Chip Pancakes
Peanut Butter Candy Bar Banana Bread

Monday, August 29, 2011

Quick and Easy Weekday Breakfast

    Once school is in session, mornings can be a little hectic. The last thing I want to concern myself with is what to make for breakfast. Yogurt Parfaits have proven to be a quick and efficient way to get us out the door on time.
    In order to save time in the morning, I prepare our Triple Berry Yogurt Parfaits in Mason Jars (covered with a lid) and store them in the refrigerator over night. This way, when we wake in the morning, they're ready to go. Just be careful to layer the granola over the yogurt, to prevent it from becoming soggy.

Triple Berry Yogurt Parfaits:


Ingredients:

1 cup crunchy granola (I use Kashi GO LEAN)
1 cup low fat yogurt
1 cup fresh berries, mixed (strawberries, raspberries, blueberries)


Directions: 

(1) In two separate dishes of your choice (I use a 500ml Mason Jar), layer the ingredients a 1/2 cup at a time. First, the yogurt, second the granola, third the berries.

*This recipe yields two servings.


Sunday, August 28, 2011

Delicious Sunday Morning Breakfast

    I have a love/hate relationship with my grocery store. I hate that they are always trying to sell  expired food, and I love that they try to sell it for 1/2 price. If you have a need for the food that day, or you have a large enough freezer, you can rack up some serious savings.
    I was at the grocery store the other day, looking through their shelf of day old bread, and I came across this huge container of stale croissants, for just a dollar. I was instantly reminded of this Croissant French Toast. I'm always up for a great Sunday morning breakfast, and I haven't made this in quite some time. You'll be amazed by how replacing your standard bread for croissants really adds something special to classic French toast.

Croissant French Toast:

Croissant French Toast and Bacon.
Garnished with berries, whip cream and
powdered sugar.

Ingredients:
4 Croissants, preferably one or two days old
4 Lg. Eggs
1 tsp. vanilla extract
1 tsp. cinnamon
cooking spray
berries and whip cream, as garnish
warm maple syrup

Directions:
(1) Slice the croissants in half, lengthwise.
(2) In a shallow dish, combine the eggs, vanilla and cinnamon. Whisk to combine.


(3) Coat a large skillet with cooking spray, and preheat heat to medium high.
(4) Soak the croissant slices in the egg mixture on both sides.


(5) Once the croissants have absorbed a fair amount of the egg mixture, transfer to the preheated pan.
(6) Cook until golden brown on both sides. You will know they are done, when the bread no longer appears wet.


(8) Garnish with berries and whip cream. Serve with warm maple syrup.


There are no words.


*This Recipe yields 4 servings.

You may also like:
Classic Belgian Waffles
Classic Buttermilk Pancakes
Slow Cooker Steel Cut Oats

Saturday, August 27, 2011

Back to School Lunch Ideas: Part II

    For my second installment of "Back to School Lunch Idea's", I thought I would make Homemade Chicken Fingers. Every child likes Chicken Fingers don't they? Mine does anyway. And if your child does as well, chances are you are already buying them. By making your own, you get 15 healthy chicken fingers for the price of two chicken breasts. Rather than paying the absurd prices they charge for the ready made chicken fingers at the grocery store. You can get the mystery meat dark meat fingers for an affordable price, but who wants to eat those.

Homemade Chicken Fingers:


Ingredients:

2 boneless skinless chicken breasts
1/2 cup white bread crumbs
1/2 cup whole wheat bread crumbs
1/2 cup whole wheat flour
2 Lg. eggs, lightly beaten
2 Tbsps. water
kosher salt
fresh ground pepper
1/4 cup parmesan cheese, grated
2 Tbsps. parsley

Directions:

(1) Form a small assembly line with three shallow containers.


(2) In the first container combine the whole wheat flour. Season with salt and pepper.
(3) In the second container scramble together the eggs and the water until frothy. Season with salt and pepper.
(4) In the third container combine the bread crumbs, parmesan, parsley and season with salt and pepper.
(5) Using two pieces of parchment paper (or a large plastic bag) as well as a meat mallet, pound out the chicken breasts until they reach about 1/2" thick.


(6) Cut the cutlets into as many 1 1/2" strips as the size allows.


(7) Starting with the flour, the then egg bath, and lastly the bread crumbs, bread the chicken strips.
(8) Place on a lined baking dish and freeze. Once frozen place in a freezer safe bag or container until ready to use.


(9) Once ready to use, preheat the oven to 350 degrees F. Bake for 30 minutes (15 minutes on each side).
A healthy meal, equals a happy child


*This recipe yields approximately 15 Chicken Fingers.

Friday, August 26, 2011

Homemade Flour Tortilla's

    I was consulting my weekly meal plan, as I do every morning and I realized that I was due to make Chicken and Rice Burritos. Turns out I was fresh out of Flour Tortilla's. You can't have burritos without tortilla's...but I didn't feel like driving to the grocery store, so I decided to make some of my own.
    It wasn't a huge deal. I have been wanting to make some Homemade Flour Tortilla's for a while now anyway. I had even purchased the handy tortilla press from an ethnic market on a past trip to Montreal.
As the old saying goes, There's no time like the present.
    The original recipe asks for lard, but I don't keep that in my pantry so I decided to use margarine instead (Even though the recipe specifically warns against substituting. That's right I'm a rebel like that). Everything still worked out well. I also doubled the recipe, and placed the cooked tortilla's between pieces of parchment paper and prepared them for the freezer. Hopefully they will keep well and I will be able to use them in future recipes. I'll keep you posted.

Homemade Flour Tortilla's:
(From allrecipes.com)


Ingredients:

4 cups all-purpose flour
1 tsp. salt
2 tsps. baking powder
2 Tbsps. lard
1 1/2 cups water

Directions:

(1) Whisk the flour, salt, and baking powder together in a very large mixing bowl.


(2) Mix in the lard with your fingers or a pastry blender, until the flour resembles cornmeal.


(3) Add the water and mix until the dough comes together; place on a lightly floured surface and knead a few minutes until smooth and elastic.


(4) Divide the dough into 12 equal pieces and roll each piece into a ball.

Begin cutting the dough into equal pieces.

(5) Preheat a large skillet over medium-high heat.
(6) Use a tortilla press or a well-floured rolling pin to roll a dough ball into a thin, round tortilla.


(7) Place into the hot skillet, and cook until bubbly and golden; flip and continue cooking until golden on the other side.

(8) Place the cooked tortilla in a tortilla warmer; continue rolling and cooking the remaining dough.


Thursday, August 25, 2011

Rainy Afternoon Activity

     To keep from going stir crazy today, we thought we would break out a new activity. Although we have a plethora of "crayola" play dough on reserve, it's always nice to experiment and make some of your own. This Kool-Aid Play Dough smells great, is non- toxic and keeps well. It can be created in minutes leaving you with plenty of time to enjoy your quality time together.

Kool-Aid Play Dough:


Materials:


1 cup flour
1/2 cup salt
3 Tbsp oil
1 small pkg. of Kool Aid (any color)
Large mixing bowl
Wooden Spoon

Directions:

(1) Combine flour, salt, oil, and Kool-Aid in a large mixing bowl.

(2) Add 1 cup of boiling water.


Little hands at work.
(3) Stir together until combined.
(4) Knead mixture until  it forms a soft dough.

It smells delicious. But tastes horrible..lol

*You can use immediately, or let cool.
*Once made, you can store indefinitely if kept sealed when not in use.


You may also like:

Edible Peanut Butter Play Dough